How to Optimize Images for Your Ebook
Welcome back to our three-part series on optimizing media for your ebooks. In the first post, we showed you how to optimize videos, and we learned that videos usually require the most optimization. If you missed it, check it out: How to Optimize Videos and Add Them to Your Ebook. The next part of our series, How to Optimize Audio for Your Ebook is also worth a look if you plan on adding audio to your ebook. And today, we’ll show you how to optimize images.
As for images, you’ll find that several factors contribute to the size of your image files, such as the resolution and file type. In this article, we’ll show you how to optimize these factors to reduce the image file size while preserving quality. We’ll also give you ideal dimensions for ebook book covers, ebook app icons, and the images inside your ebook.
What Does Image Optimization Mean?
Image optimization refers to the process of adjusting images to reduce their file size without significantly affecting their quality. The goal is to make images load faster on websites and applications, which improves the reading experience.
Important Read: The Ebook Author’s Guide To Images.
Factors that Affect the Image File Size
As we’ve mentioned earlier, there are several factors that can affect the file size of your image. Knowing how to control these factors will help you optimize these images while also maintaining their quality.
Image Dimensions
Many of the extraordinary DLSR photographs and Photoshop creations are produced for large prints, sometimes even poster size. If your ebook will most likely be read on a phone, there’s no point in cramming a poster-size image into the palm of your hand. So, all we need to do is resize the image for your target screen, and you’ll see your file size go down.
Image Resolution
Choosing between image quality and file size isn’t straightforward. When you opt for higher quality, the file size tends to increase. However, with JPGs and lossy compression, you might not sacrifice as much quality as expected. Still, there’s no universal rule—it’s a nuanced decision.
If your images are a very high resolution, you probably can afford to reduce the quality to the lowest setting when you save your JPG files. Although experimenting with reducing JPG quality is ideal, not everyone has time to try different values for quality and compare, for each image. So here’s what you can do: try one or two images at four different settings, then pick the setting you like most and apply it to all your images.
File Type
Each image file type is designed for a different purpose. The two most popular are PNGs and JPGs. To read more about other types see this table comparing 16 file types: Common image file formats.
- PNGs were designed to reduce file size by limiting the range of colors to RGB for web use, coupled with lossless compression.
- JPGs offer a broader color range suitable for printing and achieve this by using varying degrees of lossy compression to reduce file size.
For the average user, the two file types are interchangeable. However, if your images are numerous and integral to your ebook, We recommend you read Rick Mathews’ advice: Digital Image File Types Explained. Since it’s a lengthy article, here’s the bottom line:
JPG is the format of choice for nearly all photographs on the web. Never use JPG for line art, [use] PNG.
Use PNG, if you have an image with large areas of exactly uniform color, or if you want to display a photograph without loss on the web.
Important Tips Before Optimizing Your Images
Before we begin optimizing, you need to answer the big question: Do your images need to be optimized? In order to answer that question you’ll need to know two things:
- What is the ideal image file size?
- What sizes are your images?
We’re here to help you. So we’ll give you all the data, and then at the end, we’ll make answering these questions quick and easy.
1. What Is the Right Image Size?
The answer can vary, depending on your purpose and target screen size. We’ll give you some official guidelines, specific recommendations, and a general guideline you can use for most images in any form of digital content.
Cover Images
| Kotobee Books | Kindle | Kobo | Apple Books | |
| File type | JPG or PNG | JPG or TIF | JPG or PNG | JPG or PNG |
| Width:Height ratio | 2:3 | 1:1.6 | 3:4 | 1:1.5 to 1:2 |
| Dimensions | 600 x 900 pixels | Min: 1,600 x 2,560 pixels Ideal: 625 x 1,000 Max: 10,000 x 10,000 | 1,400 x 1,875 pixels | Min: 1400 pixels (short side) |
| Minimum Resolution | – | 300 ppi | 300 dpi | 300 dpi |
| Maximum File size | 500 KB | 50 MB | 5 MB | 20 MB |
| For more details | Kotobee Books Help | KDP Help | Kobo Help Centre | Asset Guide |
Images inside your Ebook
| Kotobee Books | Kindle | Kobo | Apple Books | |
| File type | JPG or PNG | JPG or GIF | JPG or PNG | JPG or PNG |
| Resolution | – | 300 dpi | 300 – 900 dpi | Max: 4 million pixels total |
| For more details | Kotobee Books Help | KDP Help | Kobo Help Centre | Asset Guide |
Note: According to the latest Apple Books Asset Guide, we recommend providing images that are at least 1.5 times the intended viewing size up to a maximum of 2 million pixels (image height multiplied by image width should be less than 2,000,000px).
Official guidelines of the other major distribution venues.
Bookmark this page. When it’s time to publish, you’ll need these links.
Ebook Web Apps and Desktop Apps
If you’re creating ebooks to be viewed on a computer screen, as in our ebook web apps or ebook desktop apps, you’ll want larger images than for mobile phones. The ideal image size is the same as with any web image:
- Fill the width of the screen: 1,500 pixels – 2,500 pixels wide.
- Most images: 500 – 700 pixels wide.
- Thumbnails: around 150 pixels wide.
Mobile Devices
If you’re creating ebooks that you expect will be read on mobile devices like EPUBs or Mobile Apps, we recommend you keep image size to a minimum to reduce loading time and overall file size.
To get an idea of the largest image sizes that mobile devices can display, the iPhone 15 Pro Max maxes out at 430 x 932 pixels, and the iPad Pro at 2048 x 2732 pixels. So any images you have larger than that should be optimized.
Full Page Images
Occasionally, you’ll want to include a full-screen image and you’ll want the image to be clear and crisp. We recommend that you set the image width to the same width as the largest device. Any images that are smaller will not look good when enlarged, and images that are significantly larger are excessive and will weigh down your book.
Aim for the following widths for full-screen images.
- Landscape: 1920 – 2048 pixels wide
- Portrait: 1280 – 1536 pixels wide
Images Surrounded by Text
Most images in your ebook will not stand alone on the page; there will be text above/below and even around the image. For these images, we suggest you resize their width to 350 – 1000 pixels.
In case you’re interested in the detailed specs:
iOS
Phones
- Max dimensions: 430 x 932 pixels (iPhone 15 Pro Max)
- Recommended width in portrait mode: 350 – 430 pixels
- Recommended width in landscape mode: 400 – 932 pixels
iPads
- Max dimensions: 2048 x 2732 pixels (iPad Pro)
- Recommended width in portrait mode: 600 – 2048 pixels (depending on desired screen coverage)
- Recommended width in landscape mode: 900 – 2732 pixels (depending on desired screen coverage)
Android
Phones
- Max dimensions: 480 x 960 pixels (varies by device)
- Recommended width in portrait mode: 360 – 480 pixels
- Recommended width in landscape mode: 480 – 960 pixels
Tablets
- Max dimensions: 1200 x 1920 pixels (varies by device)
- Recommended width in portrait mode: 600 – 1200 pixels (depending on desired screen coverage)
- Recommended width in landscape mode: 800 – 1920 pixels (depending on desired screen coverage)
App Icons
Icon size differs on phones and tablets. Our recommendation is to create icons that are 512 x 512 pixels. However, do not create icons that are less than 120 x 120 pixels.
2. How to Know the Size of Your Images
Windows
To know the size of your images on your Windows computer, simply go to File Explorer and open the folder that has all your images. Set the view to display Content or Details and ta-da! The dimensions in pixels of all your images are displayed. If you select Details, you’ll be able to sort by file Size or Dimensions. If Dimensions is not displayed, you can add it. For detailed instructions, see the Microsoft Support Center.
Apple
In the Photos app on your Mac, double-click a photo to view the image. Then click the Info button in the toolbar or press Command-i. All the image data will appear including the file size and image dimensions. For more information, visit Apple Support.
Kotobee Author
If you already added your images to your ebook in Kotobee, all your images are saved in one folder. In Kotobee Author open your ebook, click on Settings, then Open Working Directory. File Explorer will open with all your files. Open the EPUB folder, then imgs. All the images in your ebook are listed along with their sizes. Go ahead and replace the images here with the optimized ones. Use the same file names as the originals.

Should You Crop Your Images?
The final question before you resize: Would your image look better with some of it cropped out? If so, crop first then resize (if still necessary). In fact, do all edits, before you optimize your image.
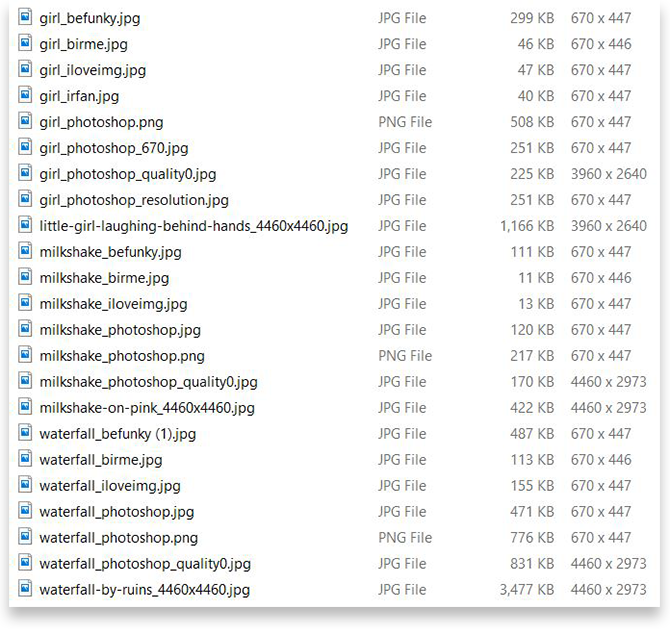
Here, we present the same picture in a series of variations:
- The first two images are cropped. The initial one was saved at its original size but with JPG quality set to zero.
- The second image is the same crop, resized to 670 pixels wide, with maximum JPG quality (set to twelve).
- The third image remains the original, uncropped version, resized to 670 pixels wide.
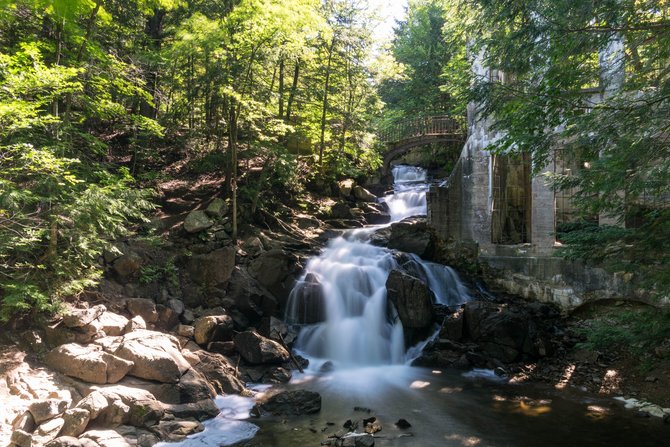
- Lastly, we have a more severe crop, focusing on the waterfall passageway beneath the bridge at the center of the image.
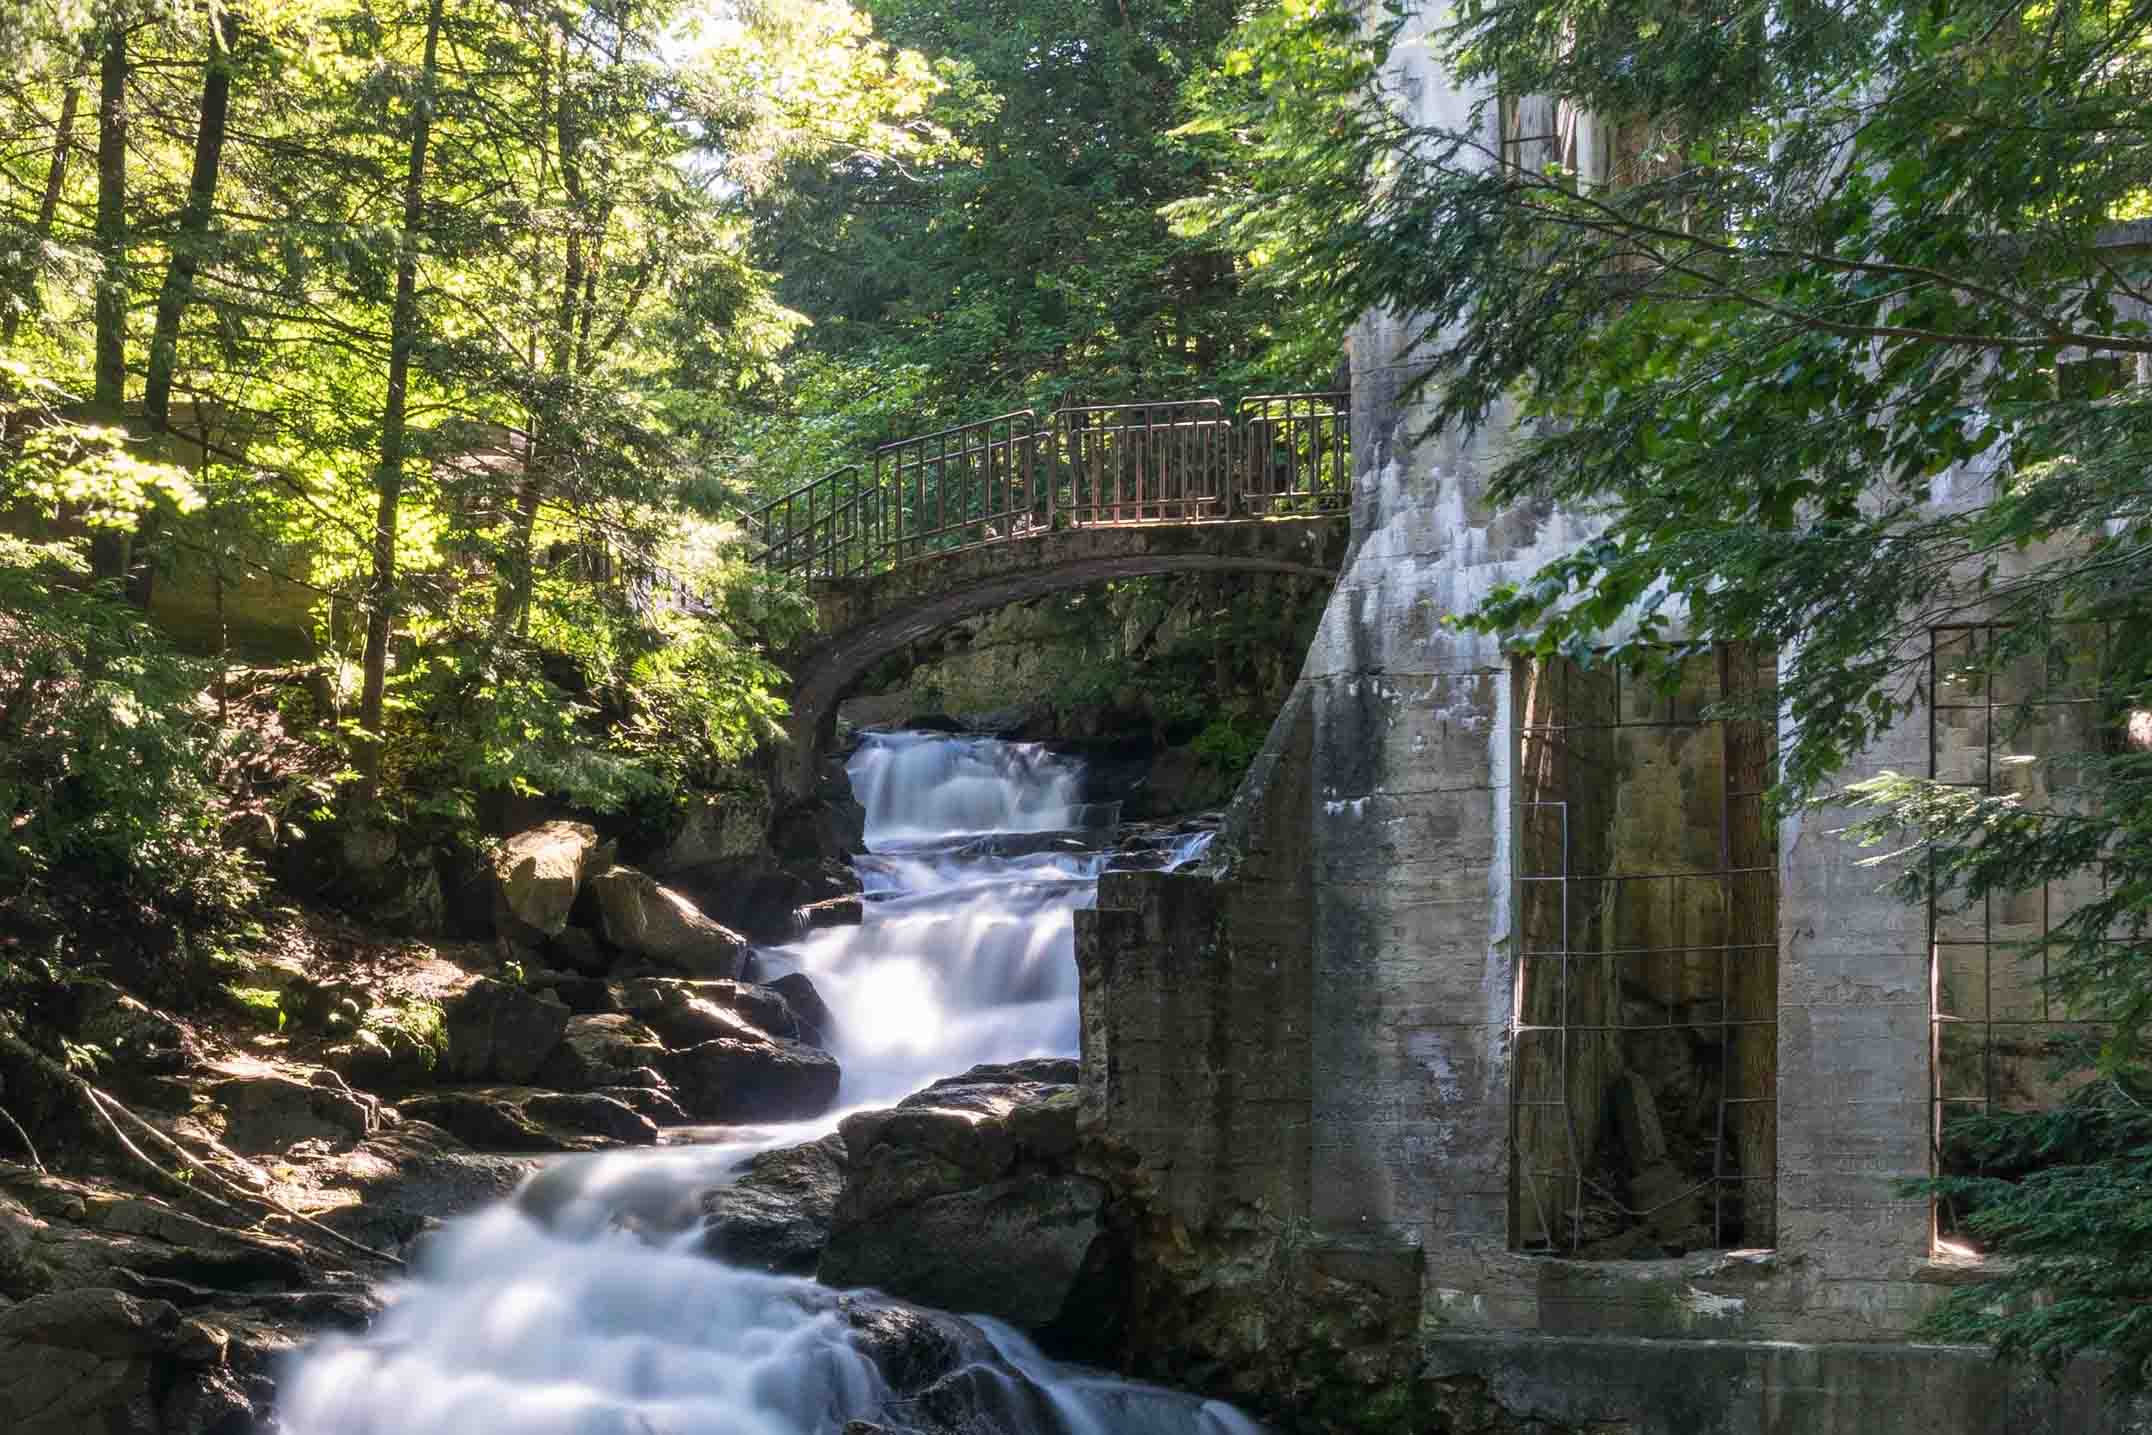
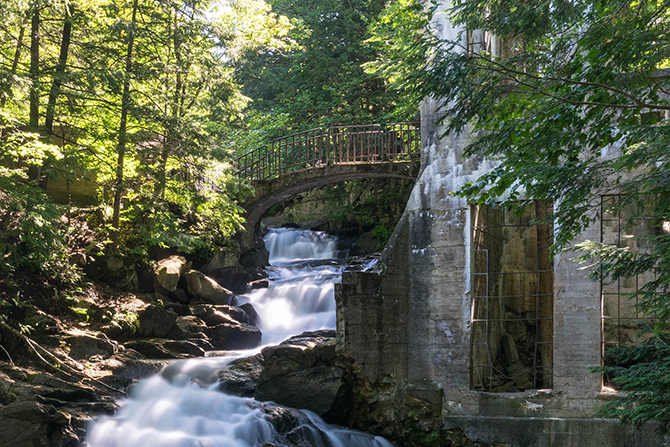

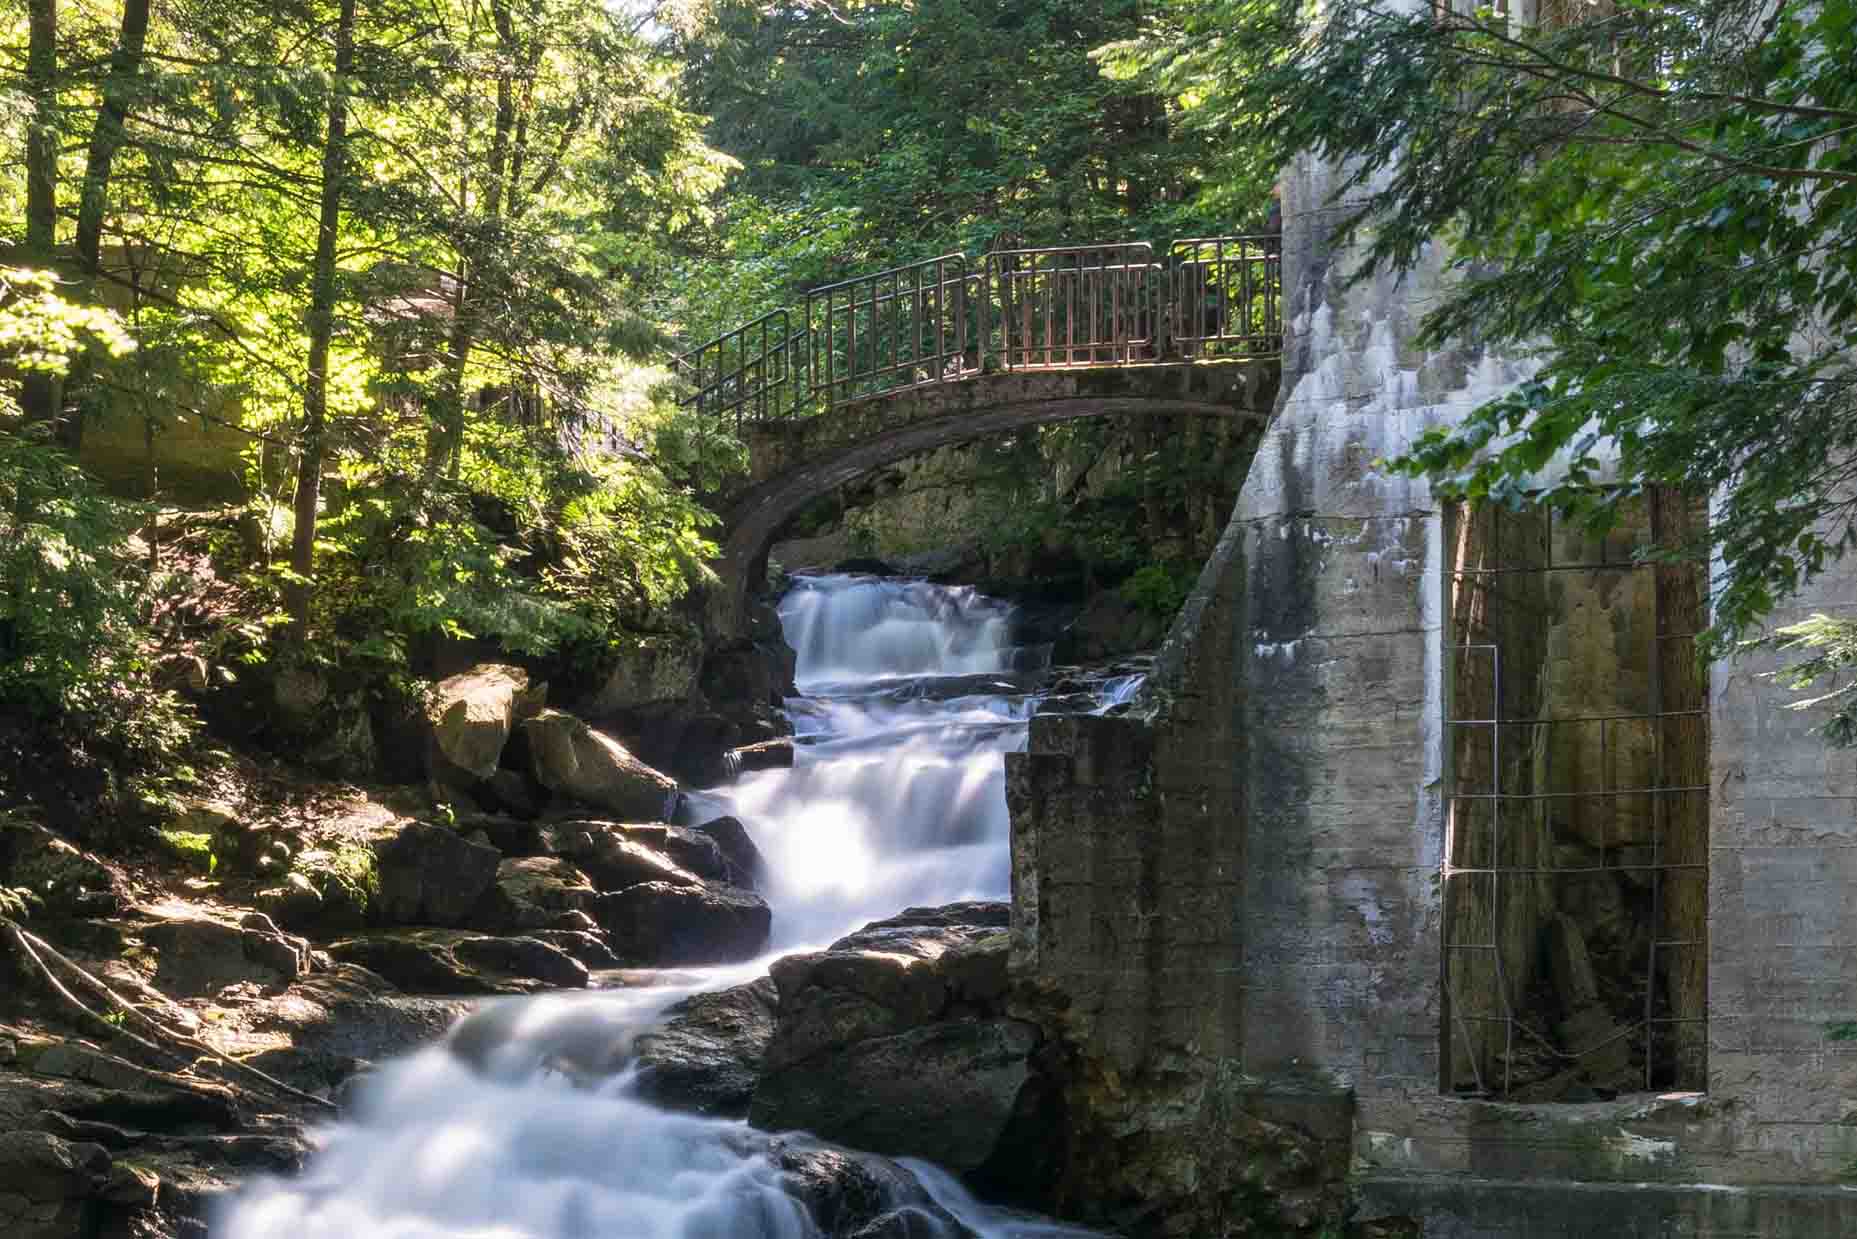
Surprisingly the largest most stunning image in these is the last one with the smallest file size, less than half the size of the uncropped yet resized original.
We learn two things:
- Cropping can make a beautiful image stunning.
- Occasionally reducing the JPG quality results in smaller files with a higher resolution than resizing.
You’ll see in the data at the end of the post, that in most cases simply reducing the quality does not sufficiently reduce file size.
Image Width Recommendations in Pixels
After all those long details and specifications, here is the summary. The recommended image width for all images in your ebooks.
| Device | Full Screen | Most Images |
| Desktop | 1920 – 2500 pixels | 600 – 800 pixels |
| Mobile Devices | 1280 – 2048 pixels | 400 – 1200 pixels |
| Ebook App Icons | 1024 x 1024 pixels | |
Now compare your image dimensions to the widths in this table. If the widths of your images are greater than these guidelines, optimize the images.
How to Optimize Your Images
To save you time, we’re going to show you how to do all your images at once, in one batch, if you want all your images the same size. If you want several different sizes, then you can resize them in several different batches.
Online Tools
If you don’t plan on going through this process often and don’t want to download software just to resize the images, you can get it done quickly and easily online. Just drag-n-drop, select the new image size, and the images will be ready to download or even download automatically.
There are many, many online options for resizing images. We’ll share with you our favorites and tell you why we like them. If you don’t like our favorites, don’t worry there are plenty of others. Check out Web Designer Depot’s The Best Image Compression Tools on the Web for an in-depth comparison of 14 online platforms.
1. iLoveIM
iLoveIMGis fast and easy. Here’s how to use it:
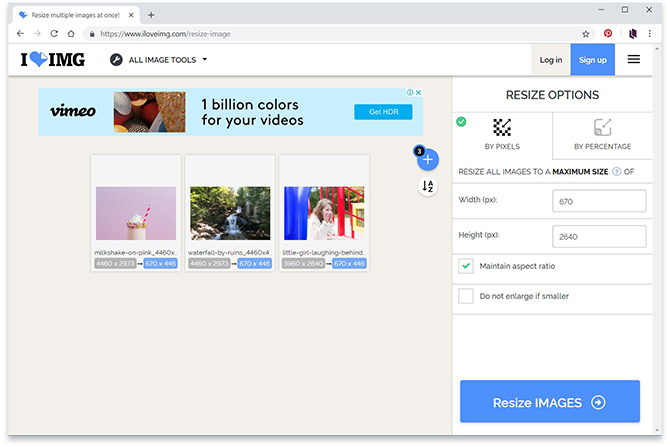
- Drag and drop all the images.
- Select by Pixels.
- Enter the image width you want. (Maintain aspect ratio should be checked.)
- Click Resize IMAGES.
Almost instantly your resized images will be ready.
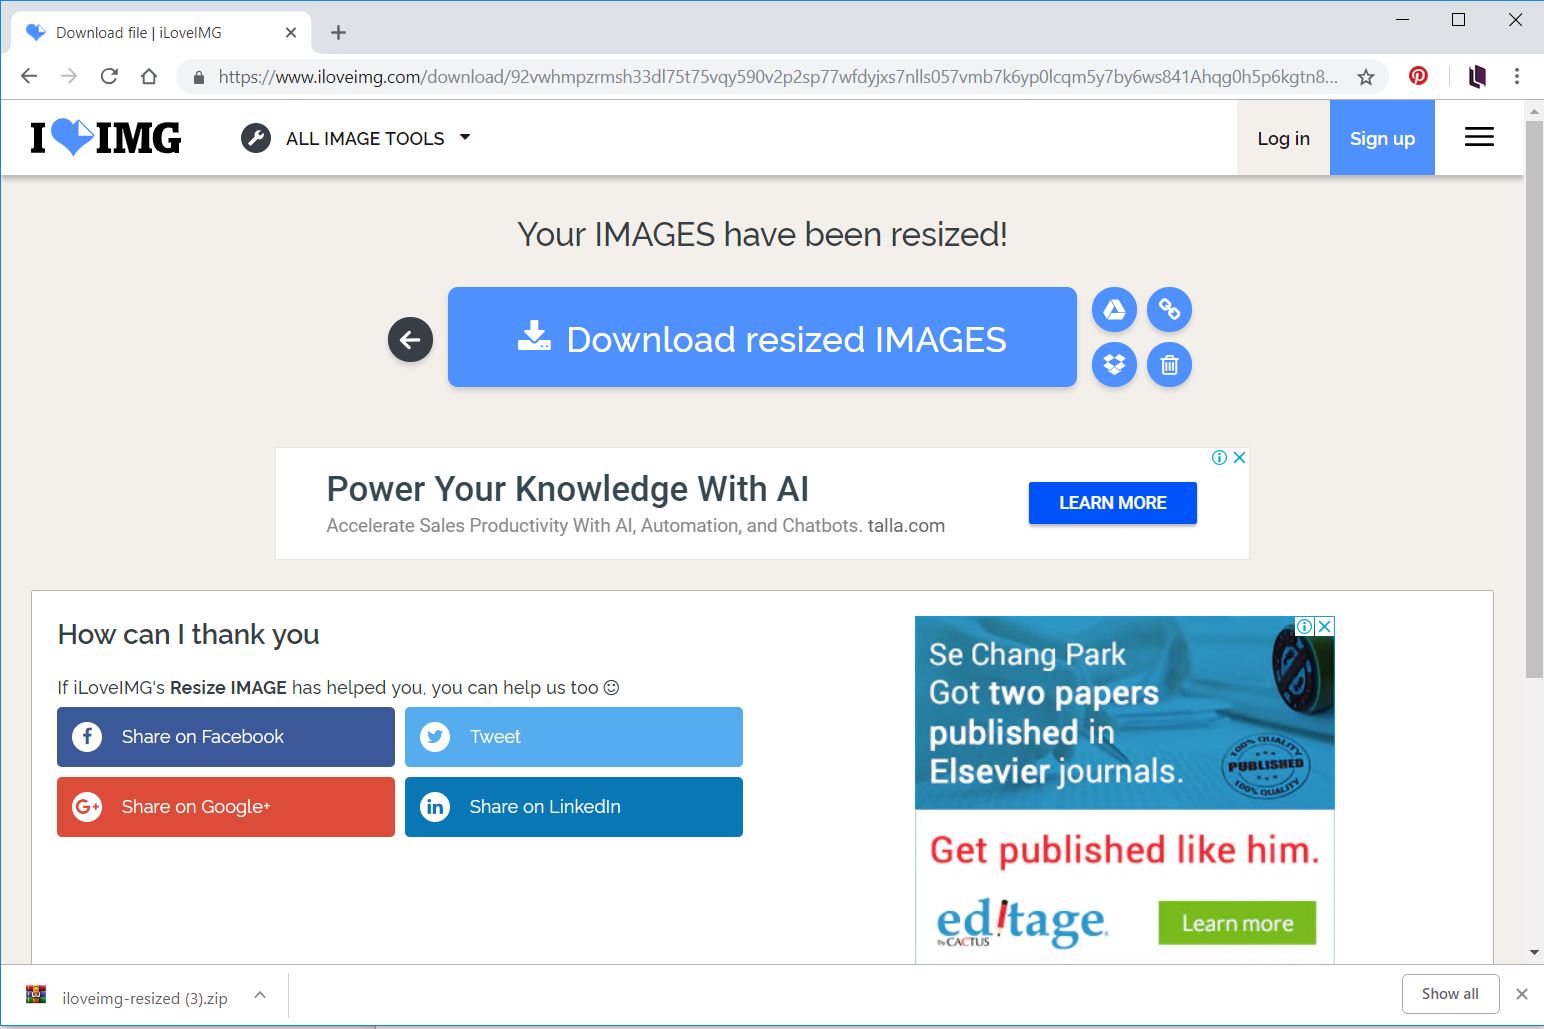
- Click Download resized IMAGES. A zip file will download with all your images.
2. BeFunk
If you want to crop or make minor edits to the images before resizing them, try BeFunky. A nice interface with many free features in their photo editor, including resizing. Batch resizing and other advanced options, unfortunately, require a paid subscription.
3. Pixlr
Pixlr is a popular online editor for its Photoshop® mimicry. Just keep in mind that you do need to have Flash® enabled, in order for Pixlr to work.
Desktop Editors
If you’d like to download a free open-source photo editor, you can try Gimp for both MAC and Windows. Here we’ll show you how to use the highly-reviewed, IrfanView.
IrfanView 32-bit is only 2.4 MB and will get the job done. But if your images are over 1.3 GB, then download the 64-bit version.
To resize one image at a time is simple:
- Open the image, go to menu Image>Resize/Resample.
- Set the width (make sure the aspect ratio is locked) and click OK. The file will be resized.
- Then go to menu File>Save As and choose JPG.
Unfortunately, resizing and uploading a batch of images in IrfanView isn’t as simple, so we’ll walk you through it.
1. Go to File Menu and select Batch Conversion/Rename.
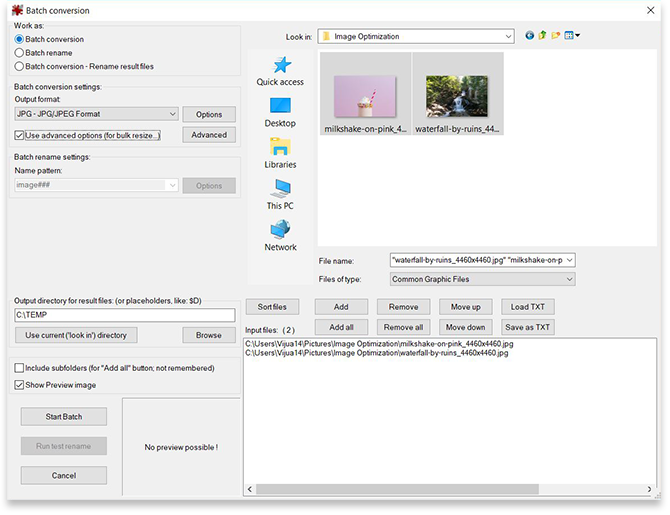
2. The Batch Conversion window will appear. Select the files you want to resize. Then click Add All.
3. Set the Output directory to the folder where you want to save the new images.
4. Check Use advanced options. Then click the Advanced button.
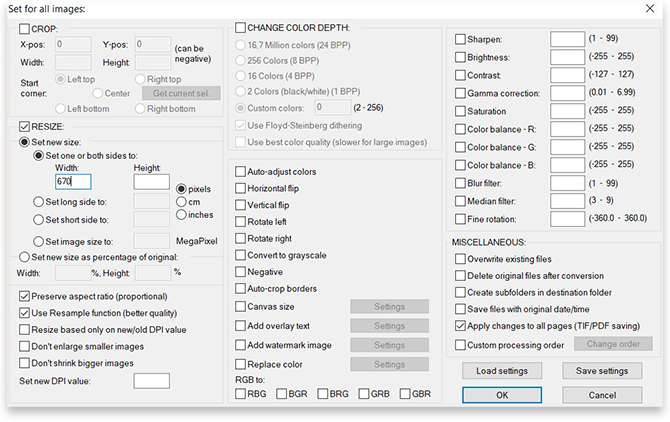
5. Another window will appear titled Set for all images. The optional settings can be overwhelming, we’re ignoring them all, except Resize.
6. Check Resize and enter the new Width. Make sure that the Preserve aspect ratio box is checked. Then click OK.
7. You’ll be back in the Batch Conversion window. Click Start Batch.
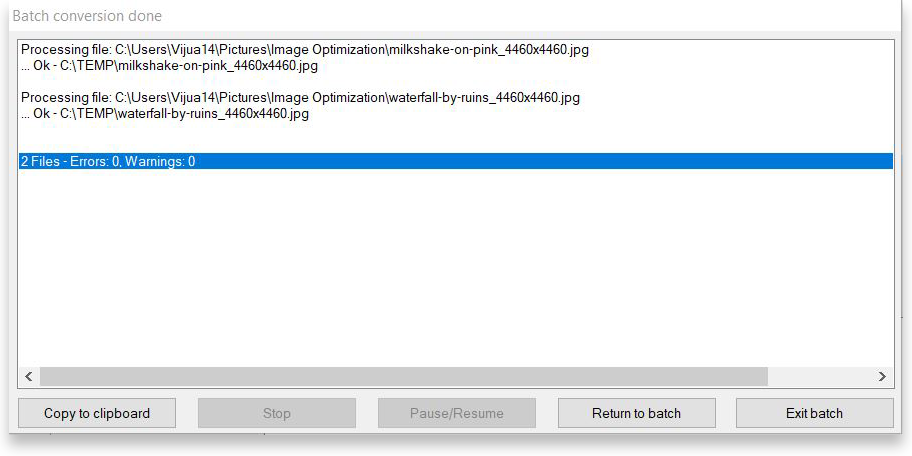
8. When the conversion is completed, a report window will appear. You’re done.
While IrfanView offers more options and settings than the online tools. It also involves more steps and can be tedious. You’ll see in the results below though that its resulting file can be comparable to Adobe’s Photoshop.
If you happen to be editing your images in Photoshop®, then add resizing to your list of edits. We recommend doing most edits before resizing, except adding text. Add text after you resize the image or it won’t be legible.
If you happen to be editing your images in Photoshop®, then add resizing to your list of edits. We recommend doing most edits before resizing, except adding text. Add text after you resize the image or it won’t be legible.
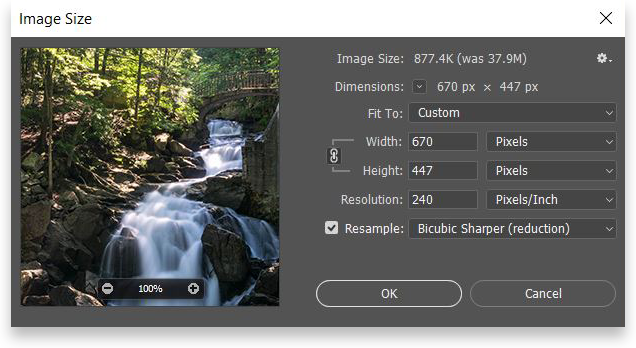
Resizing While Editing
- Go to Image and select Image Size
- When the window opens enter the desired Width. Make sure the Constrain Proportions option (which locks the width and height together) is enabled.
- Click OK.
Resizing When Saving
We mentioned earlier that we’ll show you how to test different image quality settings in Photoshop®, so here it is. When you’re done editing your image, you can resize the image and test different file types and image qualities in one place. But before we begin, We recommend selecting the 4-Up tab, to compare different file types and quality settings.
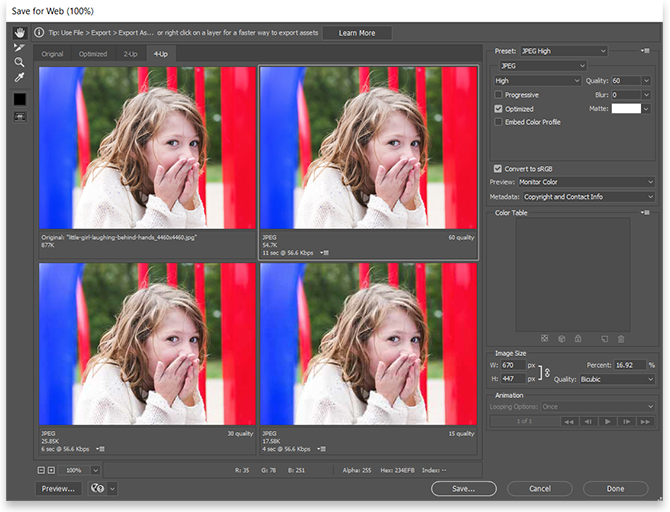
- From the File menu select Save for Web. The Save for Web window will appear.
- Set the Image Size (lower right corner), by entering the new width (W:) in pixels, and all the samples will immediately change to the new dimensions. You’ll now have in front of you, your image at the right size and at 4 different quality settings.
- Then go up to the right corner where you can set the file type and image quality for each window individually: remember, for photographs JPG, and for graphics PNG.
- When you’re done, select the image sample you like best and click Save, and don’t forget to rename the file to keep your original intact.
The Results
So here it is, after all the how-to’s, what you’ve all been waiting to see: The Results! Here are the images in their original size and resized using each of the software options.
Below each set of photos, you’ll find a visual showing how small the new file images are compared to the original file size. So, for example, a file that is 50% of the original file size is half the original size.
We’ve also included additional data for images that didn’t make it into the blog:
- PNG: These images were reduced to the same size as the others in Photoshop and then exported as PNG files.
- JPG Quality: These images have the same dimensions as the original image but were saved as JPGs with the quality set to zero.
Original image
4460 x 2973 pixels 3,477 KB

Resized Images
Width: 670 pixels


IrfanView reduced the file size to 137 KB, just 4% of the original file size, and the waterfall is just as inviting. However, the picture looks slightly faded compared to the others. You’ll need to decide whether your ebook will benefit more from adding more images at this quality, or if having just one large high-quality image is more important. In this case, we’re comparing having 1 picture or 25 pictures.
Original image
3960 x 2640 pixels 1.13 MB


IrfanView reduced the file size to just 40 KB, only 3% of the original file size, and the little girl is just as adorable. The picture does look slightly faded compared to the others. If the image is surrounded by text, this little girl’s spunk will come flying off the page, even in the little 40 KB image. You’ll need to decide whether your ebook will benefit more from adding more images at this quality, or if having just one large high-quality image is more important. In this case, we’re comparing having 1 picture or 33 pictures.
Original image
4460 x 2973 pixels 422 KB

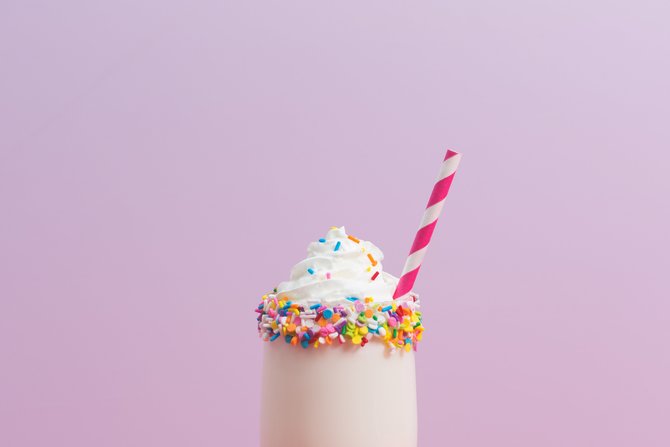

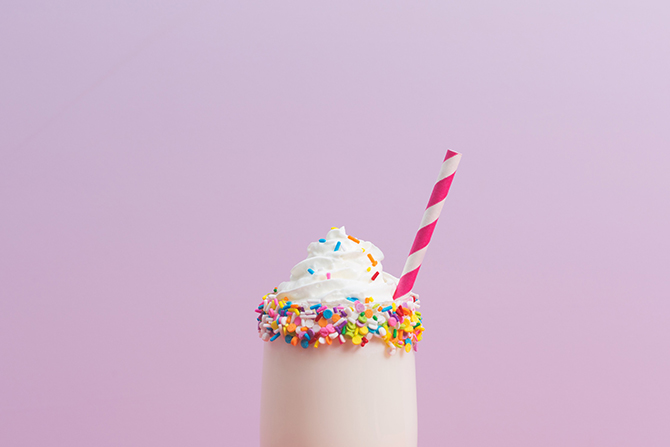
iLoveIMG reduced the file size to only 12KB, just 3% of the original file size, and the milkshake is still as stunning as all the others. The colors are not as vibrant nor the sprinkles as crisp, but ultimately it has the same mouth-watering effect on us. You’ll need to decide whether your ebook will benefit more from adding more images at this quality, or if having just one large high-quality image is more important. In this case, we’re comparing having 1 picture or 33 pictures. Notice, although to our eyes it seems that the background is a uniform color, there are shadows, so technically it’s not, which is why the PNG file did not shrink more than the JPG.
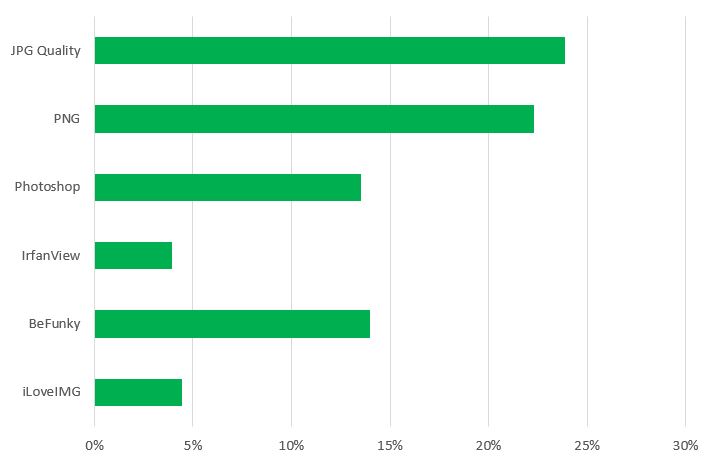
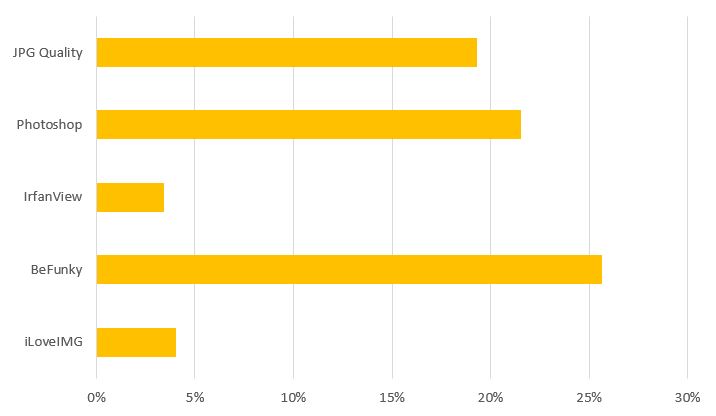
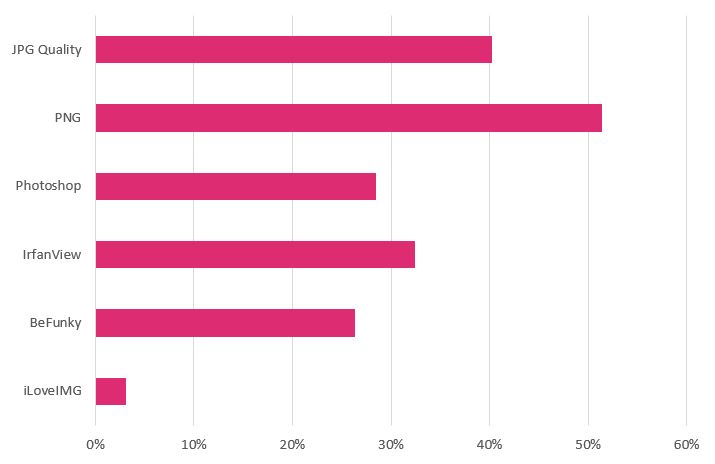
Averages
Here is the average percent reduction for each tool or method.
| iLoveIMG | 4% |
| IrfanView | 13% |
| Photoshop | 21% |
| BeFunky | 22% |
| JPG Quality | 28% |
| PNG | 39% |
Although IrfanView outperformed iLoveIMG in two of the three images, iLoveIMG consistently reduced the file size the most. As expected, saving photographs as PNGs is a waste of file space. Photoshop seems to be the perfect middle ground, offering high quality and reasonable file sizes.
If you want lots of images in your ebook and they don’t need to be stellar, iLoveIMG will serve you best. It’s also the quickest and easiest tool of them all.
If you want high-quality images and consider file size a fair price to pay, then Photoshop will be your best option, especially if you’re already using it to edit your images.
Recap
Check if your images are within the advised ranges for the devices your ebooks will be read on.
| Device | Full Screen | Most Images |
| Desktop | 1920 – 2500 pixels | 600 – 800 pixels |
| Mobile Devices | 1280 – 2048 pixels | 400 – 1200 pixels |
| Ebook App Icons | 1024 x 1024 pixels | |
If the details in the image are of the essence, then use Photoshop® and play with the jpg quality setting when you save your image. If having high-quality images isn’t as important, then we recommend using the quick online tool IloveIMGs. It’ll help you get a tiny file that still looks good.
In most ebooks, you’ll need both types of images: Large vibrant images for full-screen displays, and small images that appear only in a portion of the screen. So now you have the perfect tools for all occasions.
.
Read More
Everything You Need to Know About Aggregators
Guide to Selling on Amazon, Barnes & Noble, and Kobo
Ebook Formats Explained for Beginners
More from Our Blog


TuckerdogNC
July 4, 2020WOW. I had no idea about the sizing. I’m working on an ebook and I have little images throughout of a baseball. On the 6 x 9 book they are 1/4″ by 1/4″. On the android phonte they take up the entire screen. And are white background vs transparent. I will now have to fix. Thanks for all this info.
Kotobee
July 5, 2020We’re glad to have been of help!
TuckerdogNC
July 5, 2020What I’m missing is I have a logo I have changed the size of, in Photoshop, down to 120 x 78 pixels. And when I place it in the word doc it’s huge. Do I just drag and drop at this point and see if the size is what I want? I can do a screen capture if that helps. I thought I’d be well on my way and I can’t get this even to work.
Kotobee
July 9, 2020Can you please contact support@kotobee:disqus .com with your problem? I’m sure they’d be happy to help.
Alison Watt
November 21, 2022Thank you! This is so helpful! I’ve been looking for all this information and this is the best post I’ve found. Hopefully, my book can now be published ASAP.
Kotobee
April 5, 2023Thank you for your feedback! We’re glad that our post was helpful to you.
We wish you the best of luck with your book publication. 🙂
Joseph Barnett
February 11, 2024Thumbnail size i think is 75 kb and look good on my android….but i am confused. I want what looks good on phone. So i edit on phone then crop on phone. Then resize ( set 512×512) then insert inti giigle dic eBook. Then upload to google play?
Kotobee
May 7, 2024Hello Joseph,
It sounds like you’re on the right track with optimizing images for your ebook. A thumbnail size of 75 kb is generally sufficient for mobile devices, and setting your images to 512×512 pixels is a good standard for thumbnails. Editing and cropping on your phone can work well since it allows you to see how the image will appear on similar devices.
Best of luck!