Your 6-Step-Guide to Building an Author Website
So you’ve written a book that you believe is going to WOW readers. Great! Now how do you make sure it actually reaches them? Of course, you can post about it on social media, but in order to really set yourself apart as an established, professional writer, you need to create your own author brand.
Having an author website is an essential step in creating that brand; it’s how you connect with your readers by offering them a platform that tells a unique story about who you are and what you write about.

If you’re not tech-savvy, you might be thinking: I’m an author—what do I know about creating websites? Well, this is what this article is for! We’re here to walk you through all the steps required to create an author website that’s perfect for you, starting with choosing your domain name, all the way to deciding what to include on each page of your site.
Why Should You Have an Author Website?
Before taking you through the steps of building an author website, let’s go over the main reasons why you need one in the first place:
Reason #1: Sets You Up as a Professional
Contrary to what some might think, authors don’t work in a vacuum. Sure, the writing process itself might be a solitary act with many hours spent buried in a manuscript, but the rest of the publishing process is very much public.
An author website is a way of publicly informing your readers that you’re “legit.” It’s a platform for you to professionally showcase your author identity and your work.
Reason #2: Gives You Full Content Control
The reason it’s important to have a website, as opposed to only a social media presence, is that author websites allow their owners total editorial and design control. You can post whatever content you want (with no character limits, for example) and design your pages however you’d like. This means you’re not restricted to the regulations and algorithms set by social media platforms.
Reason #3: Acts as a Powerful Sales and Marketing Tool
Your author website, if designed correctly, can be a highly effective sales and marketing tool for your books. Aside from acting as your own personal author brand, an author website opens up a direct line of communication with your readers, informing them of upcoming book releases, where to buy your books, and any media attention your work has received.
You can therefore use an author website to sell your ebooks directly or to set up a mailing list that users can sign up for in order to receive frequent updates about your new publications, press releases, and book giveaways/signings.

A Step-by-Step Guide to Creating Your Author Website
Breaking down any task into a series of steps makes it seem far more doable. In the case of creating an author website, here are 6 steps you can follow to create a great one.
Step 1: Choose a Domain Name
A domain name is the name of your website, also known as the URL. It is the address of your website, meaning that when people type it into their browser, they will land on your website’s homepage.
Like usernames on social media platforms, domain names must be unique. Ideally, of course, you’d include your first and last name since your name is a key part of your author brand. But keeping it simple, like JaneDoe.com for example, is challenging because chances are a domain like that is already taken. You’d need to work around it, for instance by adding catchy and relevant words (e.g. JaneDoeWritesBooks.com).
You don’t, however, want to add a bunch of numbers or cryptic letters because then your website name would be very difficult to remember! Our tip is to do some research to see what’s out there. Google Domains is a useful tool to look through available domain options suitable for you.
Step 2: Buy Your Chosen Domain Name
Now that you’ve picked out an available domain name, it’s time to snatch it off the market! Your next step will be picking a trusted domain registrar from which you can buy that domain name.
Different domain registrars will offer different prices and services. Some of the popular registrars are NameCheap, Domain, GoDaddy, and Bluehost. Domain names currently cost somewhere between $12 and $25 per year.
Whichever domain registrar you choose, all you have to do is make sure your domain name is available by typing it into the registrar’s search engine. Once you’ve made your decision, you simply purchase the name online. After you make the purchase, the domain name is yours and cannot be used by anyone else.
Some domain registrars offer domain names for free, but they place a time limit on your right to use the domain, after which it’s no longer yours. Moreover, free domain names will often come with a random URL extension that might make your site appear less “legitimate.”
Step 3: Choose Your Website Host
Purchasing a domain name does not mean you will now type it into your browser and find it. In order for your URL to go “live,” you need a website hosting provider. A web hosting server “hosts” your website, giving it a place to live; it connects the content of your website to viewers online.
Often you’ll find that domain registrars also offer website hosting services so that you can buy your domain name and web hosting all in one place. However, you should explore your options before deciding. Some popular website hosting providers are Bluehost, Hostinger, HostGator, and GreenGeeks.
Step 4: Choose Your Website Platform
If a web hosting server offers a “home” or address for your website, then think of a website platform as your home’s foundation. In other words, website platforms offer a framework within which you can start building your author website.
Because web platforms are basically the software that holds all the contents of your website, your choice of web platform affects your website’s aesthetic, maintenance, and user experience. So before deciding on one, try to envision what you want your website to achieve (e.g. nicely designed but not overly complicated, with a user-friendly interface).
Here are some popular website platforms to choose from: WordPress, Drupal, Joomla, Weebly, and Squarespace.
Step 5: Design Your Author Website
When designing your author website, you should always keep your target audience in mind. What do you think they’d be most interested to see? What news about you and your work would attract them?
Here are some questions to help you decide on the general design and aesthetic of your website:
- How would you describe your ideal reader (or in this case, your ideal website visitor)? Think of their age, their interests, their level of tech-savviness, etc.
- What are three things you hope to get from your author website? Pinpointing your goals is a way to ensure you work towards achieving them. For instance, you might be aiming to increase your direct book sales, or perhaps you want to connect with more readers.
- What is the best way for your author website to achieve the previous goals you outlined? For example, if you’ve identified your ideal readers as teenagers and young adults, you might want to design your website in a way that attracts a tech-savvy audience. Or, if your goal is to gain exposure with more readers in general, you could set up a page dedicated to monthly book giveaway competitions.

Step 6: Add Content to Your Author Website
Building an author website is all about organization. An organized author website is one that offers all the information an author wants to convey without overwhelming the user.
Deciding on what to include on your author website depends on how much information you want to share: Do you want to put out a general overview of yourself and your work? Or do you want to offer little golden nuggets of information that users won’t find anywhere else?
Although creating an author website is in many ways subjective, there are some main categories that any good website should have. Here is a list of essential pages that you can use as a starting guide.
- About the Author Page
This page should include a gripping author bio, along with an author photo. Don’t be afraid to boast a little! Remember, your author bio summarizes who you are as an author and should make you appear relatable but also an authority on your subject.
- Book Information Page
It’s good to create a page that lists all of your published or forthcoming work. Each book listed should include a cover image, the title, subtitle (if any), type of binding (hardback vs. paperback), length (page count), and the publisher’s information. Most importantly, you want to include links for users to buy your books (either directly from your website or from online booksellers).
You can then link each book to a separate page that describes the work in detail, along with any reviews and/or prizes the book has been awarded, or even shortlisted or longlisted for.
- Mailing List Page
Mailing lists are essential to maintaining direct contact with your readers. Having a Mailing List page on your website enables users to register their interest in you and your work by providing you with their email addresses.
These are your fans! They will be eagerly awaiting any news about things like a new publication that’s available for pre-ordering, a great interview you’ve recently given, an upcoming book signing event, or any other information you want to share with them.
MailChimp is an example of an email marketing company that can set up a signup form for your website, as well as create professionally designed newsletters for you to send out to readers.
- Media Page
While the media page is certainly useful for your readers to see, it’s mainly geared toward reviewers and the media. You want to use this page to include some great author photos of you, the cover artwork of your books, any positive press coverage you or your work have received, and testimonials and quotes by reviewers and other authors.
Basically, this is your boasting page! The more attractive it is, the more likely potential reviewers will be interested in contacting you.
- Contact Us Page
This brings us to the Contact Us page. It’s important for readers and potential reviewers to be able to easily contact you, whether through email or mailing address. Another efficient way of allowing others to contact you is to set up a “Contact Us” form, which enables users to input their name and email address in order to send you a message.
- Social Media Buttons
Don’t forget about social media! While you don’t necessarily need an entire page dedicated to links to your social media accounts, it’s important to include “buttons” to any social media pages you have, such as Facebook, Instagram, and Twitter.
This becomes a two-way street; you use your website to gain more followers on social media, and your followers on social media in turn generate more traffic to your website.
How Much Does It Cost to Create an Author Website?
Now you’re probably thinking, “How much is all this going to cost me?” Well, the answer varies depending on which path you take when creating your author website. There are two routes to choose from: the DIY option, or hiring a professional web developer.
To start off, a beginner’s author website with a customized domain would cost you $12–$25 per year, in addition to a monthly charge of $10–$15 by a hosting platform, which brings you to an average of $200 per year.
The DIY Path
This is the path we have been discussing so far. DIY website platforms, such as Squarespace and WordPress, enable you to set up your site for free, update it yourself, and link to your social media accounts, videos, mailing lists, etc. Of course, this is time-consuming, and some authors who are not tech-savvy might find themselves a bit overwhelmed.
In that case, there is the option of hiring a developer to help you with a DIY platform— basically DIY with some assistance. This will work out cheaper than hiring a developer to create a website for you from scratch. Think of this option as having someone enhance what is already there; you’d be asking the developer to customize certain features of your DIY website.
For basic customization that doesn’t involve heavily changing the available website template, you might expect to pay somewhere around $1,000. However, if you are looking for extensive customization with advanced graphic design and additional elements, that price could go much higher!
The Custom Web Design Path
Of course, there is always the option of hiring a professional to create your website from scratch. You would need a comfortable budget for this option—expect a starting fee of around $10,000.
What you should get from a professional web designer or a design firm is a solid, professional-looking web design. Moreover, most professionals will offer updating and maintenance services post-website launch. But be careful! These will come at an additional fee, which usually starts at around $5,000.
Examples of Great Author Websites
To get you inspired, here are two author websites that we love. Although both are completely different, they each work in their own way and clearly carry their respective author brands. That’s what makes them unique and on point!
Veronica Roth’s Author Website
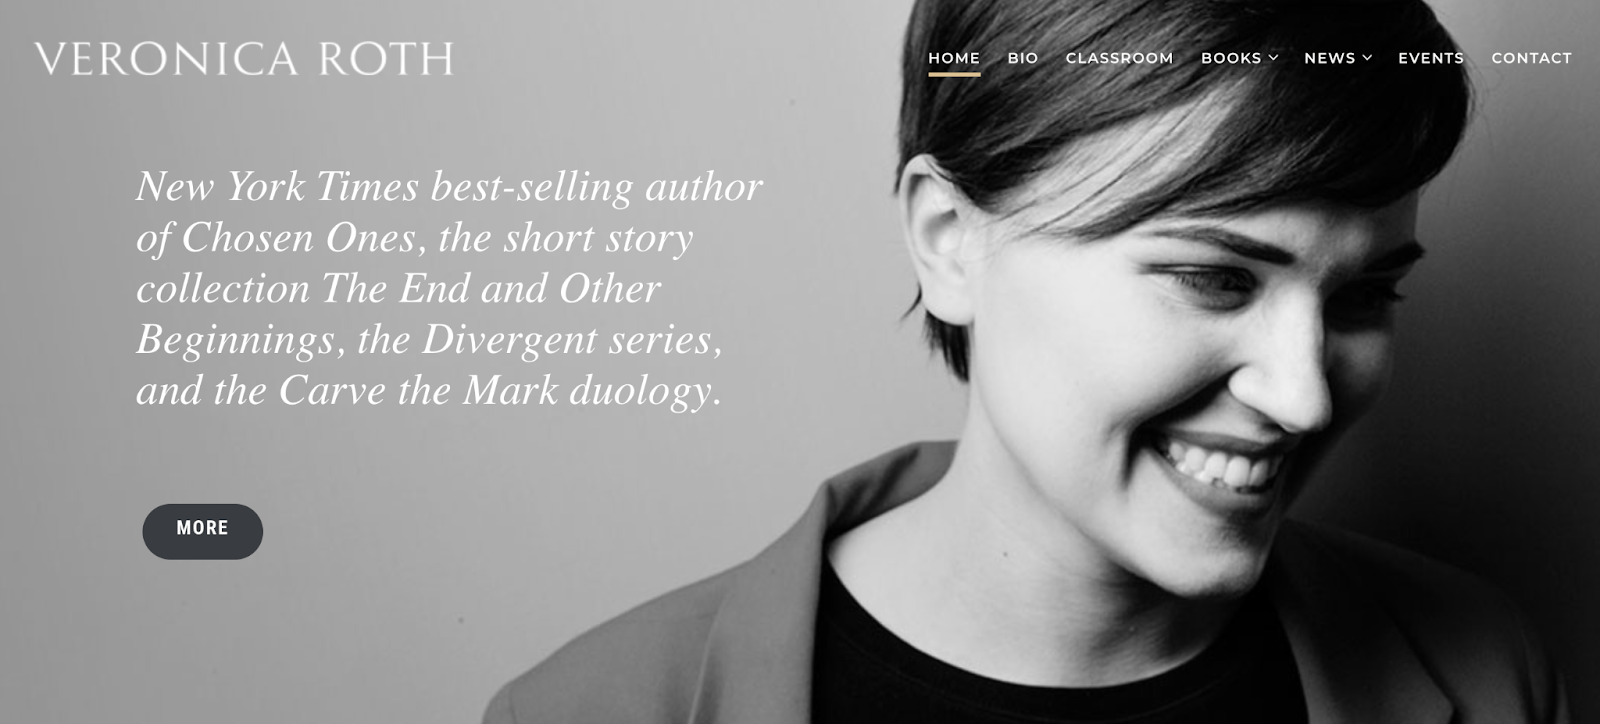
Author of the bestselling Divergent series, Veronica Roth has an author website that is both exciting and inviting. At the top of her homepage is a carousel that offers visitors the following:
- A one-line summary of Roth’s impressive author bio and an attractive black-and-white photo, along with a read “more” button
- A cover of, and link to, her debut adult novel Chosen Ones
- A description of her bestseller Divergent, with a link to all her published work
- A link to view her upcoming events with the simple prompt: “Can’t wait to meet you at my next event!”
Roth’s is an example of an author website that is easy to navigate and attractively designed, with conversational prompts and colorful backgrounds that match each book being promoted.
Jo Nesbo’s Author Website

Jo Nesbo is the author of the Harry Hole detective crime novels; and sure enough, his website does have a Mystery vibe to it! This is achieved by the subdued black-and-white background, as well as the way all the pages are neatly hidden in the upper corner under the main “Menu.” The design is therefore both minimalist and user-friendly.
Once you land on the homepage, you’re met with a link to Nesbo’s forthcoming novel Killing Moon, with options to buy it and/or read an extract. Also on the homepage is a photo of the author alongside the tagline “Learn more about the globe-trotting, rock climbing, book, film, and television-writing author who created Harry Hole.” This sets up Nesbo not just as an author, but as an interesting person with varied hobbies and passions!
Concluding Thoughts
We hope that this article has shown you that you don’t have to be an expert web designer to have an author website. Depending on your budget, you can either do it yourself, hire someone to help you, or enlist the services of a professional firm to build your website from scratch.
Whichever route you choose, just make sure that you keep your target audience in mind, and stay true to your author brand. Who you are and what you write about should shine through the moment a visitor lands on your website’s homepage.
.
Read More
9 Hacks for Perfecting Your Book Research
Exploring the Different Types of Creative Writing
Best AI Writing Software in 2026
More from Our Blog


Amar Ahmad
June 8, 2024Great insights on creating an effective author website! Thank you for sharing this blog.
Kotobee
June 10, 2024Thanks Amar for your kind words! We’re glad you found this article helpful. 🙂
photographer
June 8, 2024any recommendation for the Site builder? can we use the Godaddy builder to Build a site.
Kotobee
June 10, 2024Hi Photographer!
GoDaddy is a user-friendly option, especially for beginners. However, keep in mind that customization can be somewhat limited. If simplicity is your priority, GoDaddy might be suitable.
There are several other options as well, including WordPress and Squarespace, which give you more control over your website. WordPress offers extensive customization and scalability and Squarespace is known for its modern, visually appealing templates.
So consider what features are most important to you, such as design flexibility, ease of use, or specific functionalities, and choose a builder that best meets your needs.
Lily
June 16, 2024Thank you for sharing such valuable insights on crafting a compelling author website!
Kotobee
August 6, 2024Hi Lily!
Thank you for your kind words! We’re glad you found our content helpful 🙂
Lrmapk
August 20, 2024This article is a fantastic resource for authors looking to build their online presence. The step-by-step guide is clear and insightful, making it accessible even for those without technical expertise. Thank you for providing such valuable advice—it’s a great tool for learning how to create a professional author website!
Kotobee
September 4, 2024Thanks Lrmapk for your kind words! We’re glad you found this article helpful 🙂
Micke Oplr
August 21, 2024I want to create Author website witch hosting do you recommend?
Kotobee
September 4, 2024Hi Micke!
As mentioned in the article, some good hosting options for your author website include:
Bluehost: Known for its excellent customer service and user-friendly setup.
Hostinger: Offers affordable plans with solid performance.
HostGator: Provides good scalability and reliability.
GreenGeeks: An eco-friendly choice with strong performance and support.
Each of these hosts has unique features, so you might want to review them to see which best meets your needs.
Remini
August 23, 2024Thanks ! you are providing informative things,
Kotobee
September 4, 2024Thanks Remini 🙂
capcut
September 1, 2024thanks for information and, Do you also recommend buying the domain from Google Domains?
Kotobee
September 4, 2024You’re very welcome! We’re glad you found the information helpful. 🙂
As for your question, yes, Google Domains is a solid option for buying your domain. They offer competitive pricing, easy integration with other Google services, and reliable support. If you’re comfortable with Google’s ecosystem, it’s definitely worth considering.
GBWA
October 17, 2024You are right Thanks
david
September 11, 2024Thanks ! you are providing informative things,
Kotobee
October 31, 2024You’re welcome, David!
sana
September 12, 2024informative blog post please keeps sharing
Abofahdsh
September 16, 2024Great article for authors wanting to build their online presence! The clear, step-by-step guide makes it easy for anyone, even without tech skills, to create a professional website. Thanks for the valuable tips!
Kotobee
October 31, 2024You’re very welcome 🙂
Sarah fih
September 18, 2024Very good information, glad I found this thank you
Kotobee
October 31, 2024You’re welcome Sarah 🙂
love spell
September 19, 2024Kotobee, your guide on creating an author website is fantastic! It emphasizes the importance of building a personal brand and having control over content, which allows for authentic connections with readers. For those feeling daunted by the tech aspects, approaching it step by step is key. Let’s infuse our websites with love and creativity, inviting readers into our unique stories. Here’s to crafting beautiful platforms that reflect our voices!
Kotobee
October 31, 2024Thank you for your kind words and encouragement 🙂
spike
September 20, 2024thanks for share this information.
Cooper
September 28, 2024wow this is so interesting to know. will give it a try for sure
Hindu Dharam
September 29, 2024Thanks ! you are providing informative things
Geometry Dash
September 29, 2024I have always use namecheap do u recommend google domains? Its new to me
Kotobee
October 31, 2024Google Domains is a solid option for buying your domain. They offer competitive pricing, easy integration with other Google services, and reliable support. If you’re comfortable with Google’s ecosystem, it’s definitely worth considering.
Michel
October 4, 2024Thanks for sharing valuable insights.
Pikashow
October 6, 2024Thank you for the details, would you suggest purchasing the domain through Google Domains as well?
Kotobee
October 31, 2024Google Domains is a solid option for buying your domain. They offer competitive pricing, easy integration with other Google services, and reliable support. If you’re comfortable with Google’s ecosystem, it’s definitely worth considering.
Oliver
October 12, 2024Thank you for sharing valuable insights on crafting an author website!
jooli
October 15, 2024Thats a good information
reminigeek
October 15, 2024very informative article
Abrar
October 17, 2024Thanks ! you are providing informative things,
imran
October 24, 2024This is such a helpful guide for authors looking to build their brand! Having an author website really does make a huge difference in connecting with readers and showcasing your work. Thanks for sharing these tips!
Michal Fink
October 25, 2024Amazing Blogs Thanks for sharing
David Smith
October 28, 2024Thankyou for this information .
Kotobee
October 31, 2024You’re welcome 🙂
platinapk
October 28, 2024Thank you for this information.
Kotobee
October 31, 2024You’re welcome 🙂
Ben
October 31, 2024Do you also recommend buying the domain from Google Domains?
Kotobee
October 31, 2024Google Domains is a solid option for buying your domain. They offer competitive pricing, easy integration with other Google services, and reliable support. If you’re comfortable with Google’s ecosystem, it’s definitely worth considering.
Alpha
November 7, 2024Awesome post! The details are really helpful and easy to understand.
john
December 2, 2024Great article for authors wanting to build their online presence! The clear, step-by-step guide makes it easy for anyone, even without tech skills, to create a professional website. Thanks for the valuable tips!
Kotobee
December 4, 2024Thanks John for your kind words.
We are glad you found the article helpful 🙂
ADRE
December 2, 2024My experience of buying domains from Google Domain was not that much good
Kotobee
December 4, 2024Thank you for sharing your thoughts! We’d love to hear more about your experience with Google Domains. What challenges did you face?
Your insights could be helpful for others considering their options!
Sonia Naz
December 3, 2024Very informative article! Thanks for sharing
Kotobee
December 4, 2024We are glad you found the article helpful 🙂
Elena Fink
December 7, 2024Amazing Blog Thanks for sharing Impressive
Kotobee
January 13, 2025Thanks Elena!
Macmoon101
December 7, 2024Nice and informative… Thanks for sharing!
Kotobee
January 13, 2025We’re glad you found this post helpful 🙂
houras
December 16, 2024This is such a helpful guide for authors looking to build their brand! Having an author website really does make a huge difference in connecting with readers and showcasing your work.
Kotobee
January 13, 2025Thank you! We’re glad you found it helpful.
And you’re absolutely right—an author website is a game-changer for connecting with readers!
CapCut
January 6, 2025Thanks ! you are providing informative things,
Phill
January 7, 2025Nice post it is quite informative
BETWIN89
January 21, 2025This is such a helpful guide for authors looking to build their brand!
Food lover
January 30, 2025Love the post. I am looking to make one for my website as well.
Kotobee
April 7, 2025Glad you like it! And best of luck with your website.
Kane Hock
January 30, 2025Author pages are very important these days.
It provides uniqueness.
Loved it
Kotobee
April 7, 2025Glad to hear it, Kane! 🙂
voirdrama
February 17, 2025merci d’avoir partagé de belles informations. ❤:
Sonianaz444
March 13, 2025This is such a helpful guide for authors looking to build their brand! Having an author website really does make a huge difference in connecting with readers and showcasing your work. Great work!
Kotobee
April 7, 2025Thanks for your kind words!
simcity mods
March 14, 2025Thanks for share
jollibee branches in cebu
March 16, 2025This inspires me! Thank you for sharing this information.
Kotobee
April 7, 2025You’re most welcome!
carparkingapk
March 23, 2025Building an author website is a crucial step for establishing your online presence. Start by selecting a domain name that reflects your personal brand, whether it’s your name or a pen name. Choose a website platform like WordPress, Wix, or Squarespace that aligns with your needs and skill level. When designing the website, focus on a simple, clean layout that’s easy to navigate, and make sure to include key sections such as “Home,” “About,” “Books,” and “Contact.”
The “Books” page should showcase your published works with images, descriptions, and links for purchase. For your “About” section, share your background, writing journey, and personal story to connect with readers. Consider adding a blog to update your readers on writing tips, news, or insights, which can also improve your website’s visibility. Finally, include a newsletter sign-up form so you can keep your audience updated on book launches and events.
Regularly update your website with fresh content, and make sure it’s optimized for mobile users, as many readers will visit your site on their phones.
yacinetvapp
April 2, 2025Just the information I was looking for. Thanks!
Kotobee
April 7, 2025You’re most welcome!
Alice Wood
April 24, 2025Love the article What are the best domain providers ? Can you please highlight?
Watch here
May 3, 2025This inspires me! Thank you for sharing this information.
magistvgratiss
May 24, 2025This 6-step guide was super practical and easy to follow, perfect for authors who may not be tech-savvy but still want to create a strong online presence. I really appreciated the emphasis on clarity, branding, and building a space that reflects your unique voice. It reminded me of how even content platforms like Magis TV Gratis need a clean, user-friendly interface to keep people engaged. Have you seen any author websites lately that really stood out to you in terms of design or content?
Remini mod
June 18, 2025Very useful and easy to understand. Great tips for authors who want their own website.
Alex Jackson
June 21, 2025Really informative!
this
July 16, 2025Really helpful breakdown! This 6-step guide makes the process of building an author website feel much more approachable — thanks for sharing!
ilti
July 16, 2025Clear and practical guide, definitely a great starting point for authors looking to build their online presence. Appreciate the step-by-step approach
cricktime
August 5, 2025It’s a wonderful blog, thanks for providing valuable insights
namaztimingkarachi
August 6, 2025Este artículo ofrece una guía clara y práctica para cualquier autor que quiera establecer su presencia online, desde definir el objetivo del sitio hasta integrar herramientas clave como formularios de contacto y boletines. Me gustó especialmente el énfasis en tener un diseño limpio y una biografía bien escrita; son detalles que realmente marcan la diferencia. Personalmente, me pareció similar a la forma en que uno organiza su día alrededor de los horarios de Namaz en Karachi: todo tiene su tiempo y su propósito. ¿Ya tienes pensado qué parte de tu historia pondrías en la página “Sobre mí”?
Suleman Ben
August 17, 2025Thanks for sharing the perfect and authentic information.
Link Flow
October 13, 2025Good Post! Excellent
free tiktok
October 17, 2025Nice post . thanks for sharing this details.
Ella Hayes
April 10, 2026Nice Info . I really enjoyed it
playpelis
June 13, 2026I really enjoyed reading “Your 6-Step Guide to Building an Author Website” because it provides a clear roadmap for creating a professional online presence as a writer. I liked how it breaks the process into manageable steps, covering essentials like choosing a domain name, showcasing your books, creating an author bio, and connecting with readers. It also highlights the importance of having a central platform to build credibility, grow an audience, and promote future work. I personally think an author website is one of the most valuable tools for writers because it helps them establish their brand and maintain direct communication with their readers.